
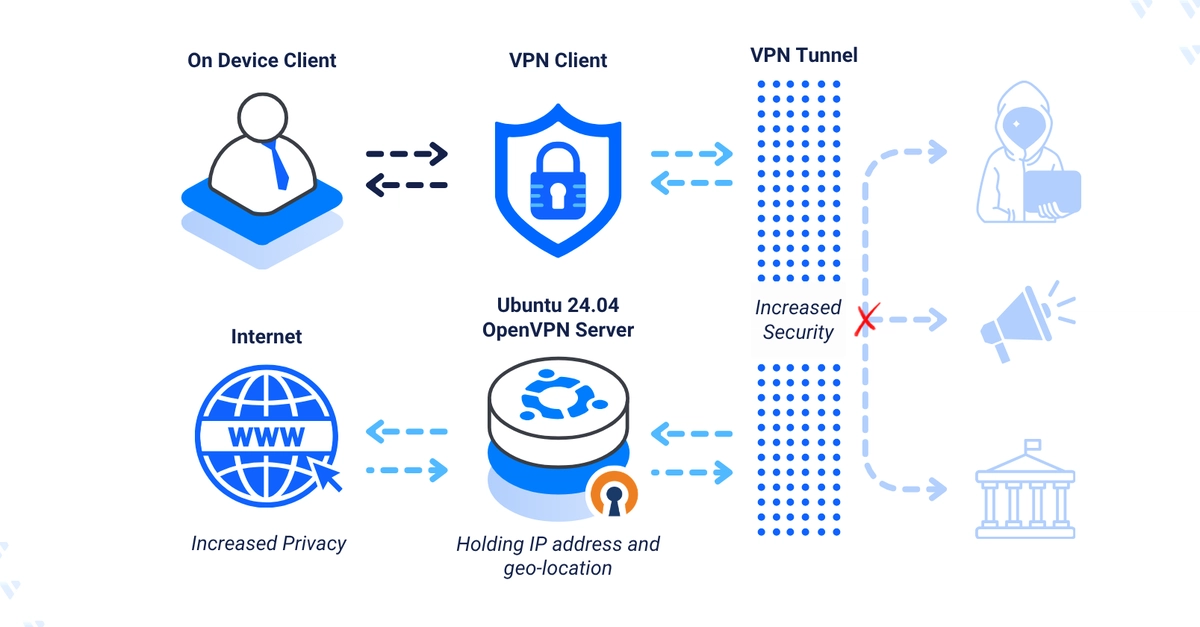
OpenVPN is an open-source, full-featured VPN solution that enables secure site-to-site and point-to-point connections. OpenVPN creates encrypted tunnels using TLS (Transport Layer Security) to secure data transmission over untrusted networks such as the Internet between clients and servers. It supports multiple encryption algorithms, including AES-256, to encrypt traffic and protect network communication from man-in-the-middle and eavesdropping attacks. This guide walks through installing OpenVPN on Ubuntu 24.04 and configuring it to create secure end-to-end encrypted connections between the VPN server and client devices. By the end, you'll have a working OpenVPN server with a signed client certificate ready to import into any OpenVPN client. Before you begin, you need access to an Ubuntu 24.04 server as a non-root user with sudo privileges. 1. Install OpenVPN OpenVPN is available in the default package repositories on Ubuntu 24.04. 1. Update the APT package index: $ sudo apt update Enter fullscreen mode Exit fullscreen mode 2. Install OpenVPN: $ sudo apt install openvpn -y Enter fullscreen mode Exit fullscreen mode 3. Verify the installed OpenVPN version: $ openvpn --version Enter fullscreen mode Exit fullscreen mode Your output should be similar to the one below. OpenVPN 2.6.12 x86_64-pc-linux-gnu [SSL (OpenSSL)] [LZO] [LZ4] [EPOLL] [PKCS11] [MH/PKTINFO] [AEAD] [DCO] library versions: OpenSSL 3.0.13 30 Jan 2024, LZO 2.10 DCO version: N/A Originally developed by James Yonan ................................................................. Enter fullscreen mode Exit fullscreen mode 2. Create the OpenVPN Server Private Key, Certificate, and TLS Encryption Files OpenVPN requires a server certificate, private key, and encryption files signed by a trusted certificate authority (CA) to enable VPN tunnel connections. Easy-RSA is a certificate authority management tool for applications like OpenVPN that issue digital certificates, including server certificates and private key pairs. 1. Install Easy-RSA: $ sudo apt install easy-rsa -y Enter fullscreen mode Exit fullscreen mode 2. Navigate to your user's home directory: $ cd Enter fullscreen mode Exit fullscreen mode 3. Create a new easy-rsa directory: $ mkdir easy-rsa Enter fullscreen mode Exit fullscreen mode 4. Link the /usr/share/easy-rsa directory to easy-rsa to access the Easy-RSA script and package files: $ ln -s /usr/share/easy-rsa/* easy-rsa/ Enter fullscreen mode Exit fullscreen mode 5. List the easy-rsa directory and verify the linked files: $ ls easy-rsa Enter fullscreen mode Exit fullscreen mode Output: easyrsa openssl-easyrsa.cnf vars.example x509-types Enter fullscreen mode Exit fullscreen mode 6. Change to the easy-rsa directory: $ cd easy-rsa Enter fullscreen mode Exit fullscreen mode 7. Create a new vars configuration using a text editor such as nano: $ nano vars Enter fullscreen mode Exit fullscreen mode 8. Add the following certificate authority configuration to the file: set_var EASYRSA_REQ_COUNTRY "US" set_var EASYRSA_REQ_PROVINCE "Georgia" set_var EASYRSA_REQ_CITY "Atlanta" set_var EASYRSA_REQ_ORG "Example Org" set_var EASYRSA_REQ_EMAIL "linuxuser@example.com" set_var EASYRSA_REQ_OU "Community" set_var EASYRSA_ALGO "ec" set_var EASYRSA_DIGEST "sha512" Enter fullscreen mode Exit fullscreen mode This configuration specifies the organizational information for building your CA, including the country, city, administrative email, and unit details. 9. Initialize the PKI using the easy-rsa script: $ ./easyrsa init-pki Enter fullscreen mode Exit fullscreen mode Output: Notice ------ 'init-pki' complete; you may now create a CA or requests. Your newly created PKI dir is: * /home/linuxuser/easy-rsa/pki Using Easy-RSA configuration: * /home/linuxuser/easy-rsa/vars Enter fullscreen mode Exit fullscreen mode 10. Build the CA to generate the root public certificate and private key pair: $ ./easyrsa build-ca Enter fullscreen mode Exit fullscreen mode Enter a strong passphrase for signing certificate requests and repeat it when prompted to secure the CA, then enter a common name for the CA, such as OpenVPN-CA. Verify the generated ca.crt CA certificate path in the output: Notice ------ CA creation complete. Your new CA certificate is at: * /home/linuxuser/easy-rsa/pki/ca.crt Enter fullscreen mode Exit fullscreen mode 11. Generate a new server certificate request. Replace vpnserver with your desired server common name. $ ./easyrsa gen-req vpnserver nopass Enter fullscreen mode Exit fullscreen mode Press Enter when prompted to verify the common name, then verify the generated public certificate request and private key paths when successful: Notice ------ Private-Key and Public-Certificate-Request files created. Your files are: * req: /home/linuxuser/easy-rsa/pki/reqs/vpnserver.req * key: /home/linuxuser/easy-rsa/pki/private/vpnserver.key Enter fullscreen mode Exit fullscreen mode 12. Sign the server certificate request using the CA: $ ./easyrsa sign-req server vpnserver Enter fullscreen mode Exit fullscreen mode Enter yes and press Enter when prompted to verify the certificate request, then enter your CA passphrase when prompted to sign it. Your output should look like the one below when successful. Notice ------ Certificate created at: * /home/linuxuser/easy-rsa/pki/issued/vpnserver.crt Enter fullscreen mode Exit fullscreen mode 13. List the pki/issued directory to verify the generated server certificate: $ ls pki/issued Enter fullscreen mode Exit fullscreen mode Output: vpnserver.crt Enter fullscreen mode Exit fullscreen mode 14. Generate a ta.key HMAC signature file to enable TLS verification and authentication on the OpenVPN server: $ sudo openvpn --genkey secret ta.key Enter fullscreen mode Exit fullscreen mode 15. List your working directory files to verify the generated ta.key file: $ ls Enter fullscreen mode Exit fullscreen mode Output: df.pem easyrsa openssl-easyrsa.cnf pki ta.key vars vars.example x509-types Enter fullscreen mode Exit fullscreen mode 16. Create a strong Diffie-Hellman parameters file to secure key exchange for encrypted OpenVPN sessions: $ ./easyrsa gen-dh Enter fullscreen mode Exit fullscreen mode Output: Generating DH parameters, 2048 bit long safe prime ..................... DH parameters appear to be ok. Notice ------ DH parameters of size 2048 created at: * /home/linuxuser/easy-rsa/pki/dh.pem Enter fullscreen mode Exit fullscreen mode 17. List the pki directory to verify the generated dh.pem file: $ ls pki/ Enter fullscreen mode Exit fullscreen mode Output: ca.crt dh.pem ..................... Enter fullscreen mode Exit fullscreen mode 18. Copy the ca.crt, vpnserver.key, vpnserver.crt, ta.key, and dh.pem files to the /etc/openvpn directory: $ sudo cp ta.key pki/ca.crt pki/private/vpnserver.key pki/issued/vpnserver.crt pki/dh.pem /etc/openvpn/ Enter fullscreen mode Exit fullscreen mode 3. Configure OpenVPN OpenVPN uses server and client configurations in the /etc/openvpn directory to create tunnel interfaces and the respective systemd services. /etc/openvpn contains the server configurations you can manage with the openvpn@ service, while /etc/openvpn/server contains additional configurations manageable with the openvpn-server@ service. 1. Copy the sample OpenVPN server configuration template to the /etc/openvpn directory: $ sudo cp /usr/share/doc/openvpn/examples/sample-config-files/server.conf /etc/openvpn/ Enter fullscreen mode Exit fullscreen mode 2. Navigate to the /etc/openvpn directory: $ cd /etc/openvpn Enter fullscreen mode Exit fullscreen mode 3. Open the copied server.conf file: $ sudo nano server.conf Enter fullscreen mode Exit fullscreen mode Make the following edits: Optional: Remove ; to uncomment the local directive and replace a.b.c.d with the server IP address OpenVPN should use to listen for incoming connections. Replace 192.0.2.100 with your server's actual public IP address. local 192.0.2.100 Find the dev directive and verify the default OpenVPN tunnel type (tun creates routed IP tunnels, while tap creates Ethernet tunnels). dev tun Find the ca, cert, and key options, then replace the default ca.crt, server.crt, and server.key values with the actual paths to your certificate authority, server certificate, and server private key files. ca /etc/openvpn/ca.crt cert /etc/openvpn/vpnserver.crt key /etc/openvpn/vpnserver.key Find the dh directive and replace dh2048.pem with your actual Diffie-Hellman file path. dh /etc/openvpn/dh.pem Find the data-ciphers directive, remove ; to uncomment it to enable OpenVPN to use strong, modern ciphers for encryption, then add data-ciphers-fallback AES-256-CBC as a fallback. data-ciphers AES-256-GCM:AES-128-GCM:?CHACHA20-POLY1305:AES-256-CBC data-ciphers-fallback AES-256-CBC Add the following auth directive below data-ciphers to specify the HMAC digest algorithm, such as SHA512, for authenticating each packet. auth SHA512 Find the server directive and specify the VPN subnet to assign client addresses. For example, change the default 10.8.0.0 subnet to 10.10.10.0. server 10.10.10.0 255.255.255.0 Find the ;push "redirect-gateway def1 bypass-dhcp" directive and remove ; to uncomment it, redirecting all traffic through the VPN. push "redirect-gateway def1 bypass-dhcp" Find the dhcp-option directives and replace the default addresses with your preferred DNS servers, such as 8.8.8.8 and 1.1.1.1, then remove ; to uncomment the options. push "dhcp-option DNS 8.8.8.8" push "dhcp-option DNS 1.1.1.1" Find the tls-auth directive, uncomment it, replace ta.key with your actual key path, and keep 0 as the direction. tls-auth /etc/openvpn/ta.key 0 # This file is secret Find the user and group pair, replace openvpn with nobody and nogroup respectively to run OpenVPN with reduced privileges, then remove ; to uncomment the options. user nobody group nogroup Save and close the file. Your modified server.conf file should look like the one below. port 1194 proto udp dev tun ca /etc/openvpn/ca.crt cert /etc/openvpn/vpnserver.crt key /etc/openvpn/vpnserver.key dh /etc/openvpn/dh.pem data-ciphers AES-256-GCM:AES-128-GCM:?CHACHA20-POLY1305:AES-256-CBC data-ciphers-fallback AES-256-CBC auth SHA512 topology subnet server 10.10.10.0 255.255.255.0 ifconfig-pool-persist /var/log/openvpn/ipp.txt push "redirect-gateway def1 bypass-dhcp" push "dhcp-option DNS 8.8.8.8" push "dhcp-option DNS 1.1.1.1" keepalive 10 120 tls-auth /etc/openvpn/ta.key 0 user nobody group nogroup persist-key persist-tun status /var/log/openvpn/openvpn-status.log verb 3 explicit-exit-notify 1 Enter fullscreen mode Exit fullscreen mode 4. Test the OpenVPN server configuration and verify it runs without errors: $ sudo openvpn --config /etc/openvpn/server.conf Enter fullscreen mode Exit fullscreen mode Your output should be similar to the one below when the configuration test is successful. Press Ctrl+C to stop the configuration test. ... 2025-07-10 22:21:00 IFCONFIG POOL IPv4: base=10.10.10.2 size=253 2025-07-10 22:21:00 IFCONFIG POOL LIST 2025-07-10 22:21:00 Initialization Sequence Completed Enter fullscreen mode Exit fullscreen mode Enable IP Forwarding 1. Open the /etc/sysctl.conf file to enable IP forwarding on the server: $ sudo nano /etc/sysctl.conf Enter fullscreen mode Exit fullscreen mode 2. Find the # net.ipv4.ip_forward=1 directive and remove # to uncomment it: net.ipv4.ip_forward=1 Enter fullscreen mode Exit fullscreen mode This configuration enables IP forwarding, allowing OpenVPN clients to route traffic through the VPN. 3. Apply the /etc/sysctl.conf configuration changes: $ sudo sysctl -p Enter fullscreen mode Exit fullscreen mode Output: net.ipv4.ip_forward = 1 Enter fullscreen mode Exit fullscreen mode 4. Run the following command to verify the public network interface on your server: $ ip route | grep default Enter fullscreen mode Exit fullscreen mode Note the public interface name like enp1s0 in your output, similar to the one below. default via 192.0.2.1 dev enp1s0 proto dhcp src 192.0.2.100 metric 100 Enter fullscreen mode Exit fullscreen mode 5. Check the UFW status and verify that it's installed: $ sudo ufw status Enter fullscreen mode Exit fullscreen mode If it's not installed, run the following command to install UFW and allow SSH traffic: $ sudo apt install ufw -y && sudo ufw allow ssh Enter fullscreen mode Exit fullscreen mode 6. Open the /etc/ufw/before.rules file to enable NAT through the firewall: $ sudo nano /etc/ufw/before.rules Enter fullscreen mode Exit fullscreen mode 7. Add the following POSTROUTING policy configuration before the *filter section. Replace enp1s0 with your actual public interface name. *nat :POSTROUTING ACCEPT [0:0] -A POSTROUTING -s 10.10.10.0/24 -o enp1s0 -j MASQUERADE COMMIT Enter fullscreen mode Exit fullscreen mode This firewall configuration modifies the default POSTROUTING policy in the nat table to masquerade all traffic from the 10.10.10.0/24 VPN subnet through the server's enp1s0 public network interface. 8. Open the /etc/ufw/sysctl.conf file to enable IP forwarding through UFW: $ sudo nano /etc/ufw/sysctl.conf Enter fullscreen mode Exit fullscreen mode 9. Find the #net/ipv4/ip_forward=1 directive and remove # to uncomment it: net/ipv4/ip_forward=1 Enter fullscreen mode Exit fullscreen mode This configuration enables IP forwarding through the firewall to route packets between the OpenVPN tun interface and other interfaces on the server. 10. Open the /etc/default/ufw file to allow forwarded packets through UFW: $ sudo nano /etc/default/ufw Enter fullscreen mode Exit fullscreen mode 11. Find the DEFAULT_FORWARD_POLICY directive and change the default value from DROP to ACCEPT: DEFAULT_FORWARD_POLICY="ACCEPT" Enter fullscreen mode Exit fullscreen mode 12. Reload UFW to apply the firewall configuration changes: $ sudo ufw reload Enter fullscreen mode Exit fullscreen mode 4. Secure the OpenVPN Server 1. Allow incoming connections to the tun0 OpenVPN interface: $ sudo ufw allow in on tun0 Enter fullscreen mode Exit fullscreen mode 2. Allow outgoing connections from the tun0 interface: $ sudo ufw allow out on tun0 Enter fullscreen mode Exit fullscreen mode 3. Allow network connections to the 1194 OpenVPN server port: $ sudo ufw allow 1194/udp Enter fullscreen mode Exit fullscreen mode 4. Reload UFW to apply the firewall configuration changes: $ sudo ufw reload Enter fullscreen mode Exit fullscreen mode 5. Check the UFW status to verify the active firewall rules: $ sudo ufw status Enter fullscreen mode Exit fullscreen mode Output: Status: active To Action From -- ------ ---- 22/tcp ALLOW Anywhere Anywhere on tun0 ALLOW Anywhere 1194/udp ALLOW Anywhere 22/tcp (v6) ALLOW Anywhere (v6) Anywhere (v6) on tun0 ALLOW Anywhere (v6) 1194/udp (v6) ALLOW Anywhere (v6) Anywhere ALLOW OUT Anywhere on tun0 Anywhere (v6) ALLOW OUT Anywhere (v6) on tun0 Enter fullscreen mode Exit fullscreen mode 5. Manage the OpenVPN Server OpenVPN uses systemd to manage the VPN interfaces based on the server configurations in the /etc/openvpn directory. 1. Enable the OpenVPN service to start automatically at boot: $ sudo systemctl enable openvpn@server.service Enter fullscreen mode Exit fullscreen mode Output: Created symlink /etc/systemd/system/multi-user.target.wants/openvpn@server.service → /usr/lib/systemd/system/openvpn@.service. Enter fullscreen mode Exit fullscreen mode 2. Start the OpenVPN service: $ sudo systemctl start openvpn@server.service Enter fullscreen mode Exit fullscreen mode 3. View the OpenVPN service status and verify that it runs without errors: $ sudo systemctl status openvpn@server.service Enter fullscreen mode Exit fullscreen mode Output: ● openvpn@server.service - OpenVPN connection to server Loaded: loaded (/usr/lib/systemd/system/openvpn@.service; enabled; preset: enabled) Active: active (running) since Thu 2025-07-10 22:27:07 UTC; 6s ago ... Enter fullscreen mode Exit fullscreen mode 4. Verify that the tun0 OpenVPN interface is active and correctly configured on the server: $ ip addr show dev tun0 Enter fullscreen mode Exit fullscreen mode Output: 4: tun0: mtu 1500 qdisc fq state UNKNOWN group default qlen 500 link/none inet 10.10.10.1/24 scope global tun0 valid_lft forever preferred_lft forever inet6 fe80::42ab:ad8b:dd59:baf4/64 scope link stable-privacy valid_lft forever preferred_lft forever Enter fullscreen mode Exit fullscreen mode Create a Client Certificate and Private Key Pair OpenVPN requires a valid client certificate and private key pair to connect to the VPN server. 1. Create a new keys directory in /etc/openvpn/client to store the client encryption keys: $ sudo mkdir -p /etc/openvpn/client/keys Enter fullscreen mode Exit fullscreen mode 2. Navigate to the easy-rsa directory: $ cd ~/easy-rsa Enter fullscreen mode Exit fullscreen mode 3. Generate a new certificate request using the easyrsa script. Replace vpnclient1 with your desired client name. $ ./easyrsa gen-req vpnclient1 nopass Enter fullscreen mode Exit fullscreen mode Press Enter when prompted to verify your client's common name, then verify the generated private key and public certificate request paths in your output. Notice ------ Private-Key and Public-Certificate-Request files created. Your files are: * req: /home/linuxuser/easy-rsa/pki/reqs/vpnclient1.req * key: /home/linuxuser/easy-rsa/pki/private/vpnclient1.key Enter fullscreen mode Exit fullscreen mode 4. Import the signing request to generate a new client certificate: $ ./easyrsa sign-req client vpnclient1 Enter fullscreen mode Exit fullscreen mode Enter yes and press Enter when prompted to verify the client's common name, then enter your CA passphrase to sign the certificate. Verify the generated client certificate path in your output. Notice ------ Certificate created at: * /home/linuxuser/easy-rsa/pki/issued/vpnclient1.crt Enter fullscreen mode Exit fullscreen mode 5. Copy the vpnclient1.crt client certificate to the /etc/openvpn/client/keys directory: $ sudo cp pki/issued/vpnclient1.crt /etc/openvpn/client/keys Enter fullscreen mode Exit fullscreen mode 6. Move the vpnclient1.key private key to the /etc/openvpn/client/keys directory: $ sudo cp pki/private/vpnclient1.key /etc/openvpn/client/keys Enter fullscreen mode Exit fullscreen mode Create OpenVPN Client Configuration Files 1. Copy the sample OpenVPN client configuration to /etc/openvpn/client: $ sudo cp /usr/share/doc/openvpn/examples/sample-config-files/client.conf /etc/openvpn/client Enter fullscreen mode Exit fullscreen mode 2. Navigate to the /etc/openvpn/client directory: $ cd /etc/openvpn/client Enter fullscreen mode Exit fullscreen mode 3. Rename the client.conf configuration to vpnclient1.ovpn: $ sudo mv client.conf vpnclient1.ovpn Enter fullscreen mode Exit fullscreen mode Choose the OpenVPN client configuration format based on your use case: ovpn for GUI OpenVPN clients on Windows, macOS, Android, or iOS, or conf for scripts and CLI tools like systemd (for example, a systemd service like openvpn-client@vpnclient.service). 4. Open the vpnclient1.ovpn configuration: $ sudo nano vpnclient1.ovpn Enter fullscreen mode Exit fullscreen mode Verify the client directive (OpenVPN configuration type) and proto udp (client protocol, which should match the server's configuration). 5. Find the remote directive and replace my-server-1 1194 with your OpenVPN server's IP address and port. Replace 192.0.2.100 with your actual server IP. remote 192.0.2.100 1194 Enter fullscreen mode Exit fullscreen mode 6. Find the ca, cert, and key options, then add # before each option to comment them: #ca ca.crt #cert client.crt #key client.key Enter fullscreen mode Exit fullscreen mode 7. Find the data-ciphers directive, remove ; to uncomment it, and verify that the cryptographic values match the OpenVPN server configuration: data-ciphers AES-256-GCM:AES-128-GCM:?CHACHA20-POLY1305:AES-256-CBC Enter fullscreen mode Exit fullscreen mode 8. Add the following auth directive on a new line to match the OpenVPN server configuration: auth SHA512 Enter fullscreen mode Exit fullscreen mode Save and close the file. Your modified vpnclient1.ovpn file should look like the one below. client dev tun proto udp remote 192.0.2.100 1194 resolv-retry infinite nobind persist-key persist-tun remote-cert-tls server data-ciphers AES-256-GCM:AES-128-GCM:CHACHA20-POLY1305:AES-256-CBC auth SHA512 verb 3 Enter fullscreen mode Exit fullscreen mode 9. Run the following command to append values from the ca.crt, vpnclient.crt, vpnclient.key, and ta.key files to vpnclient1.ovpn: $ sudo bash -c 'cat > vpnclient1.ovpn $( $( $( $( key-direction 1 EOF' Enter fullscreen mode Exit fullscreen mode 10. View the vpnclient1.ovpn file and verify your configuration's appended ca, certificate, private key, and tls values: $ cat vpnclient1.ovpn Enter fullscreen mode Exit fullscreen mode 11. Copy the vpnclient1.ovpn configuration to your user's home directory: $ cp vpnclient1.ovpn ~/vpnclient1.ovpn Enter fullscreen mode Exit fullscreen mode Optional — Revoke OpenVPN Clients: Navigate to the easy-rsa directory (cd ~/easy-rsa), then run ./easyrsa revoke and confirm with yes and your CA passphrase. Generate an updated revocation list with ./easyrsa gen-crl, copy it with sudo cp pki/crl.pem /etc/openvpn/server/, add crl-verify /etc/openvpn/server/crl.pem to the end of /etc/openvpn/server.conf, then restart the service with sudo systemctl restart openvpn@server.service and check its status with sudo systemctl status openvpn@server.service. 6. Test the OpenVPN Server 1. Download and install OpenVPN Connect for your device. 2. Open a new terminal session on your local workstation. 3. Change the working directory to your user's home directory: $ cd Enter fullscreen mode Exit fullscreen mode 4. Connect to the OpenVPN server using SFTP. Replace linuxuser with your actual user. $ sftp linuxuser@SERVER-IP Enter fullscreen mode Exit fullscreen mode 5. List the directory files and verify that the vpnclient1.ovpn client configuration is available: sftp> ls Enter fullscreen mode Exit fullscreen mode 6. Download the vpnclient1.ovpn file to your local workstation: sftp> get vpnclient1.ovpn Enter fullscreen mode Exit fullscreen mode Output: Fetching /home/linuxuser/vpnclient1.ovpn to vpnclient1.ovpn vpnclient1.ovpn 100% 8281 539.1KB/s 00:00 Enter fullscreen mode Exit fullscreen mode 7. Launch OpenVPN Connect from your applications menu, click UPLOAD FILE on the Get Connected page, then Browse to find and open the downloaded vpnclient1.ovpn client configuration in your filesystem. 8. Verify that the Server Hostname matches your OpenVPN IP and click Connect. Verify that your OpenVPN profile changes to Connected and monitor the connection statistics. 9. Run the following command in your terminal and verify that the VPN server IP is your OpenVPN server's active public IP address: $ curl ifconfig.me Enter fullscreen mode Exit fullscreen mode 10. Test the connection to any network attached to the VPN server or the Internet using a domain like google.com to verify that it is successful: $ ping google.com Enter fullscreen mode Exit fullscreen mode Output: Pinging google.com [172.217.170.174] with 32 bytes of data: Reply from 172.217.170.174: bytes=32 time=26ms TTL=108 Reply from 172.217.170.174: bytes=32 time=28ms TTL=108 Reply from 172.217.170.174: bytes=32 time=36ms TTL=108 Reply from 172.217.170.174: bytes=32 time=29ms TTL=108 Ping statistics for 172.217.170.174: Packets: Sent = 4, Received = 4, Lost = 0 (0% loss), Approximate round trip times in milli-seconds: Minimum = 26ms, Maximum = 36ms, Average = 29ms Enter fullscreen mode Exit fullscreen mode Troubleshooting OpenVPN may return connection errors depending on your server and client configurations. Connection Timeout: Error Connecting to the OpenVPN Server Open the OpenVPN client configuration file (code vpnclient1.ovpn) and verify that the remote configuration points to your OpenVPN server's public IP address and port: remote 192.0.2.100 1194 Enter fullscreen mode Exit fullscreen mode Check the server's UFW status (sudo ufw status) and verify that the OpenVPN port is allowed. If it's missing, allow it and reload UFW: $ sudo ufw allow 1194/tcp $ sudo ufw reload Enter fullscreen mode Exit fullscreen mode Then connect to the OpenVPN server again and verify the connection succeeds. Authenticate/Decrypt packet error: packet HMAC authentication failed If the server logs show an error similar to the following: Jul 06 02:04:17 Openserver ovpn-server[1767]: Authenticate/Decrypt packet error: packet HMAC authentication failed Jul 06 02:04:17 Openserver ovpn-server[1767]: TLS Error: incoming packet authentication failed from [AF_INET]192.0.2.200:59864 Jul 06 02:04:18 Openserver ovpn-server[1767]: Authenticate/Decrypt packet error: packet HMAC authentication failed Jul 06 02:04:18 Openserver ovpn-server[1767]: TLS Error: incoming packet authentication failed from [AF_INET]192.0.2.200:59864 Enter fullscreen mode Exit fullscreen mode Check the OpenVPN server logs for additional information: $ sudo journalctl -xeu openvpn-server@server.service Enter fullscreen mode Exit fullscreen mode View the OpenVPN server ta.key file and note the TLS values: $ sudo cat /etc/openvpn/ta.key Enter fullscreen mode Exit fullscreen mode Your output should look like the one below. # # 2048 bit OpenVPN static key # -----BEGIN OpenVPN Static key V1----- 1ba01f852d75016a3fd1b3b88aef9609 d52f7dd4e7858f0a219f5b9ec65b37c1 efe9458fe0e06b2ae4d1f9fee3aee929 959bd0e9e260588023fed611d803a769 108dfd5157dd95f6a627c486361e7c6d 753d65f6c25fd2278a44a872e5178f0f 58b2fddb9f3b223dc0ebc0ff95e4a58e a2cc037f8ebaad2f56bd2cafc07a57ae 04e637dfda193c37a91833eeebd664b4 60e9d6a04a86f0407ad7ca6e458d5573 9163933ecc29b567d26f5b70789fe2f5 d523f0ab7c667929a1023d5098d517f3 17f7b227a8eafaf9804fcf2713d753c7 ff35d5c36e035a123ac68a49bc67473d fba57989354045fe4305a705d5effa3d 36d447f62b9ef46e2aec61562c2900eb -----END OpenVPN Static key V1----- Enter fullscreen mode Exit fullscreen mode Open the server.conf OpenVPN server configuration (sudo nano /etc/openvpn/server.conf) and verify your data-ciphers and auth values: data-ciphers AES-256-GCM:AES-128-GCM:?CHACHA20-POLY1305:AES-256-CBC auth SHA512 Enter fullscreen mode Exit fullscreen mode Then open the OpenVPN client configuration file: $ nano /etc/openvpn/client/vpnclient1.ovpn Enter fullscreen mode Exit fullscreen mode Compare the tls-auth values and verify that they match your OpenVPN server's ta.key file: # # 2048 bit OpenVPN static key # -----BEGIN OpenVPN Static key V1----- 1ba01f852d75016a3fd1b3b88aef9609 d52f7dd4e7858f0a219f5b9ec65b37c1 efe9458fe0e06b2ae4d1f9fee3aee929 959bd0e9e260588023fed611d803a769 108dfd5157dd95f6a627c486361e7c6d 753d65f6c25fd2278a44a872e5178f0f 58b2fddb9f3b223dc0ebc0ff95e4a58e a2cc037f8ebaad2f56bd2cafc07a57ae 04e637dfda193c37a91833eeebd664b4 60e9d6a04a86f0407ad7ca6e458d5573 9163933ecc29b567d26f5b70789fe2f5 d523f0ab7c667929a1023d5098d517f3 17f7b227a8eafaf9804fcf2713d753c7 ff35d5c36e035a123ac68a49bc67473d fba57989354045fe4305a705d5effa3d 36d447f62b9ef46e2aec61562c2900eb -----END OpenVPN Static key V1----- Enter fullscreen mode Exit fullscreen mode Verify that key-direction is set to 1: key-direction 1 Enter fullscreen mode Exit fullscreen mode And that data-ciphers and auth match the OpenVPN server configuration: data-ciphers AES-256-GCM:AES-128-GCM:?CHACHA20-POLY1305:AES-256-CBC auth SHA512 Enter fullscreen mode Exit fullscreen mode Transfer the OpenVPN client configuration to your client device and test the connection again. Next Steps Generate additional client certificates for more devices, each with a unique common name. Set up a certificate revocation list (CRL) workflow so you can revoke compromised or unused client certificates. Review the OpenVPN server logs periodically for authentication or connection errors. Explore the OpenVPN documentation for advanced routing and multi-client setups. For the full guide with additional tips, visit the original article on Vultr Docs.
Installing OpenVPN on Ubuntu 24.04
Full Article
Original Source
Read the full article at Dev →KhanList aggregates and links to publicly available news content. We do not host full articles from third-party sources. Always verify important information with original sources.