
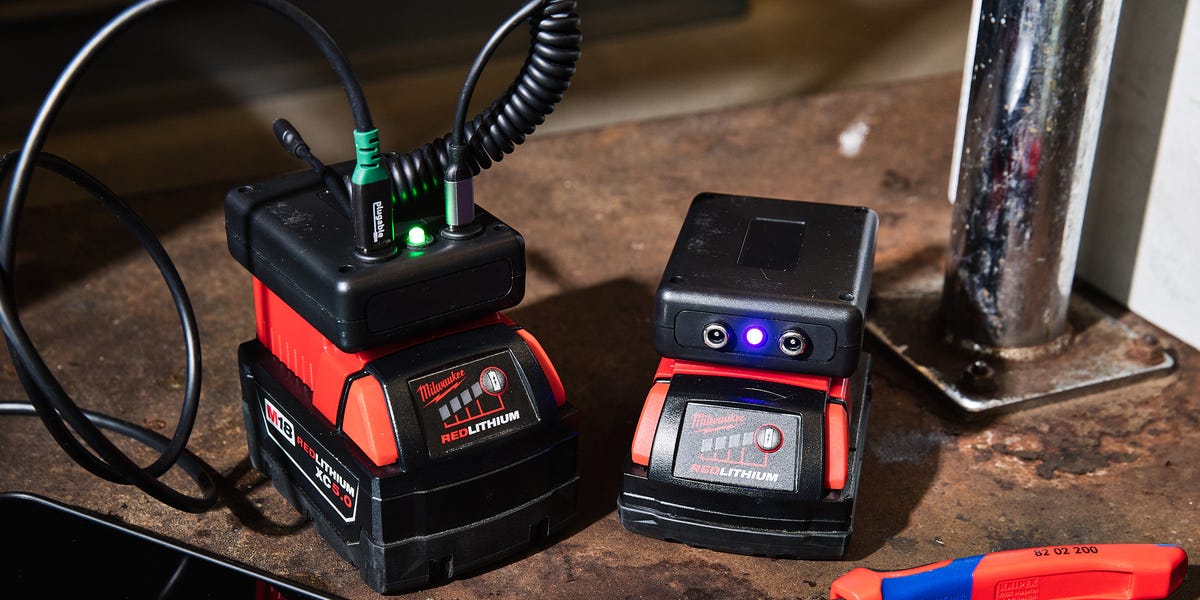
4 min readThese days, many of the devices we use and rely on are cordless. This, in turn, means we rely heavily on small, powerful batteries to keep those devices running. We even use standalone battery packs—called power banks—to power and charge those devices. If you’ve considered buying one of these power banks, I’ve got something else for you to consider: Build an adapter to power your devices that locks onto your existing tool batteries. The process is really very simple and, if you own cordless tools, you probably already have at least a couple of powerful batteries on hand.I came to this realization last year and didn’t really pursue making a project out of it until I needed to power a guitar effect pedal. I didn’t want another cable strung across the floor or another direct current (DC) power brick plugged into the power strip. So, this tool battery-to-power bank conversion was my solution. You can use it to power or recharge just about anything that runs on DC electrical current drawing less than 18 volts. Here’s how you can make one yourself.Project Notes and InfoA DC-to-DC buck converter is the key component of this project. You’ll need it so the DC voltage of the tool battery (18 to 20 volts) drops down to the voltage required for the device you’ll be powering or charging. Typical standard voltage for USB A and C ports is 5 volts. The buck converter I used is adjustable to output anywhere from 1.5 to 35 volts. Since we’re starting with a max of 20 volts, the max we can output is 18.5 volts.Some devices, such as LED desk lights or 12-volt auto accessories, use USB ports solely to power them—with no data being transferred. Some of these may require more than 5 volts. For these devices, you’ll need to know their power requirements in voltage and amperage, so you can adjust the buck converter for the proper output. For higher amperage applications, you may need to get a bigger, more powerful buck converter.You can easily find adapters for DeWalt, Milwaukee, Makita, and Ryobi tool batteries. Though these are the most popular, with a little searching, you can locate them for a couple of other brands.What You’ll NeedTools:DrillAssorted drill bitsSoldering ironWire cutter/stripperScrewdriversMultimeterSupplies and Materials:Tool battery adaptersDC-to-DC buck converterPlastic project boxDC output sockets/ports: USB A, USB C, or 5.5 x 2.1 mm20 AWG copper wire, 18 AWG for higher amperage applications (you need this only if the output part you use does not have preinstalled wire leads)Self-adhesive circuit board standoffsLED element and bezel (optional)Note: Several of the parts needed for this project are only sold in multiples. So you’re going to end up with extra parts. This is a good thing though, because once you build one, you’ll likely have ideas and improvements and want to make another one. Plus, your friends are going to be jealous, and they’ll probably want one too.How to Do ItStep 1: Fasten project box to battery adapterLine up the battery adapter on top of the project box. Make sure the adapter switch is accessible and not blocked. Once positioned, mark the project box through the holes in the battery adapter. Drill the holes in the box and then attach it to the adapter with two screws and nuts.Trevor RaabUse an awl or other sharp tool to mark where to drill the mounting holes.Trevor RaabUse small (#6) screws and nuts to attach the project box to the adapter.Step 2: Drill holes for wires and sockets/portsBend up the wires on the adapter and mark where you want them to enter the project box. On the other side of the box—either on the end or the top—mark where you want to install the sockets and an optional LED power indicator, if desired. Drill the holes where marked.Trevor RaabUse an awl to mark where you want the wires to enter the project box.Trevor RaabStart by drilling a small hole and then make it bigger with progressively larger bits.Step 3: Install DC-to-DC buck converterPress two circuit board standoffs through the holes in the buck converter. Remove the adhesive backing on the standoffs. Noting the location of the inputs on the buck converter, stick the buck converter in the box with the inputs facing the end where you made the holes for the wires, then press down.Trevor RaabThere are two mounting holes in the buck converter. Push a standoff into each hole.Trevor RaabRemove the adhesive backing from the standoffs and press them firmly into the box. Be sure the input side of the converter faces the wires from the adapter.Push the wires through the holes and trim so that the ends line up with the inputs on the buck converter. The black wire goes to the input marked – (negative) and the red to the input marked + (positive).Trevor RaabTrim the leads from the adapter and strip the ends.Trevor RaabBe sure to solder the black wire to the negative input and the red to the positive.Strip about a quarter inch of each wire. Tin the ends of the wires by applying some solder to them as well as the inputs on the buck converter.Solder the leads to the inputs on the buck converter.Step 4: Test and adjust the buck converterConnect a battery to the adapter and turn it on the adapter. Turn on the multimeter and set it to DC voltage and measure the voltage on the outputs of the buck converter.Trevor RaabAdjust the output of the buck converter by turning the small screw on top of the blue trimmer.Trevor RaabTouch the red lead to the positive output and the black to the negative. For the USB C ports, we need 5 volts.To adjust the voltage, turn the small screw on top of the blue trimmer on the buck converter. Check voltage again and repeat, measuring and adjusting until you reach the desired voltage. For USB ports, that’s 5 volts.Turn off the adapter switch and remove the battery.Step 5: Install USB power ports and LEDPush the USB C ports through their holes and tighten the fixing nuts snugly. Trim the wires long enough to reach the buck converter with a little slack. Strip about half an inch at the ends of the wires.Trevor RaabInstall the USB C ports by pushing them through the holes and fastening them on the inside with their fixing nuts.Trevor RaabPush the LED bezel through from the outside and the LED into it from the inside.If you’re installing an LED power indicator, push the bezel into the box from the outside, then push the LED into the bezel from the inside. Trim and strip as you did for the USB ports.Trevor RaabTwist the black (negative) wires together, and the red (positive) wires together and tin them lightly with solder. Note: My LED had a green positive wire.Trevor RaabSolder the leads to the buck converter terminals marked output, red to positive and black to negative.Twist the red (positive) wires of the ports and LED together, then twist the black wires together. Tin the ends of the wires and the outputs on the buck converter. Finally, solder the black wires to the output marked – (negative) and the red wires to the output marked + (positive).Trevor RaabSlip the top on the box, connect a battery, and turn the adapter on to be sure the LED lights up.Plug the battery back into the adapter and turn it on to confirm the LED comes on.Step 6: Finish by closing the project boxPut the top on the project box and fasten it with the included screws.Trevor RaabTuck the wires out of the way and put the top on the project box.Trevor RaabSecure the top of the box with the screws provided.That’s it. Your tool battery-powered power bank is ready to use.Trevor RaabBrad Ford has spent most of his life using tools to fix, build, or make things. Growing up he worked on a farm, where he learned to weld, repair, and paint equipment. From the farm he went to work at a classic car dealer, repairing and servicing Rolls Royces, Bentleys, and Jaguars. Today, when he's not testing tools or writing for Popular Mechanics, he's busy keeping up with the projects at his old farmhouse in eastern Pennsylvania.
How to Build a DIY Power Bank From Cordless Tool Batteries
Full Article
Original Source
Read the full article at Popularmechanics →KhanList aggregates and links to publicly available news content. We do not host full articles from third-party sources. Always verify important information with original sources.